1번째 작업 : GUI의 develop 브랜치(root)와 VM의 feature/tfjs-handpose 브랜치에서는 빌드 성공 + 내가 작성한 코드가 반영 잘 됨
그러나 2번째 작업 : face-detection을 적용하기 위한 feature/tfjs-face 브랜치에서 작업 후, 다시 feature/tfjs-handpose로 돌아와 빌드하면 빌드 실패
오류 내용
node:internal/modules/cjs/loader:1084 Uncaught Error: Cannot find module '@mediapipe/hands'
Require stack:
C:\Workspace\AI\Handpose\ai_roborobo\node_modules@tensorflow-models\hand-pose-detection\dist\mediapipe\detector.js
C:\Workspace\AI\Handpose\ai_roborobo\node_modules@tensorflow-models\hand-pose-detection\dist\create_detector.js
C:\Workspace\AI\Handpose\ai_roborobo\node_modules@tensorflow-models\hand-pose-detection\dist\index.js
C:\Workspace\AI\Handpose\ai_roborobo\index.html at node:internal/modules/cjs/loader:1084:15 at Function._resolveFilename (node:electron/js2c/renderer_init:2:5527) at node:internal/modules/cjs/loader:929:27 at Function.<anonymous> (node:electron/js2c/asar_bundle:2:13327) at Function._load (node:electron/js2c/renderer_init:2:4757) at Module.require (node:internal/modules/cjs/loader:1150:19) at require (node:internal/modules/cjs/helpers:121:18) at Object.<anonymous> (C:\Workspace\AI\Handpose\ai_roborobo\node_modules@tensorflow-models\face-detection\dist\mediapipe\detector.js:56:21) at Object.<anonymous> (C:\Workspace\AI\Handpose\ai_roborobo\node_modules@tensorflow-models\face-detection\dist\mediapipe\detector.js:210:3) at Module._compile (node:internal/modules/cjs/loader:1271:14)
GUI에서 최종 빌드를 진행하기 때문에, 위 오류는 결국 GUI에서 @mediapipe/hands 모듈을 인식하지 못한다는 소리가 됨
GUI는 ①node_modules/@tensorflow-models 에서 hand-pose-detection 모델을 인식하고, ②node_modules/scratch-vm/~ 에서 VM과 관련된 코드를 인식함. 이 때 둘은 npm link로 이어져 있음
그러나 나는 VM에 @mediapipe/hands 모듈을 설치해놓은 상태였음에도 GUI가 인식하지 못함
따라서 npm link의 문제라고 생각함
1. npm link 의미(용도)
Symbolic link ( 줄여서 Symlink) = 바로가기 파일
GUI에서 npm link VM 을 실행하면, 외부 모듈(VM)이 현재 프로젝트(GUI)의 node_modules 디렉토리에 설치된 것처럼(npm install한 것처럼) 사용될 수 있게 해줌
즉 해당 모듈(GUI)에 VM에 대한 전역 심볼릭 링크를 설정하는 것
2. npm link 사용법
위 오류 해결 방법 후보
프로젝트 변경될 때마다 (VM에 브랜치 생성할 때마다), GUI의 develop 브랜치에 npm link
프로젝트 변경될 때마다 (VM에 브랜치 생성할 때마다), GUI에 브랜치 생성하여 npm link
내 생각 1: GUI root 디렉토리를 계속 건드리는게 좋지 않아 보임, 따라서 후보2를 실행해보려고 함
그러나 npm link는 브랜치 단위가 아닌 프로젝트 단위(디렉토리 단위)로 생성됨
따라서 후보2를 실행해도 브랜치별로 다른 npm link가 걸리는 것이 아니라, 설정된 npm link가 계속 변경됨
따라서 후보1 실행하기로 함
핵심 코드
// blocks
npm link l10n

// l10n
npm link l10n

// VM
npm link l10n blocks --force  // peer dependency conflict 방지

// GUI
npm link l10n blocks VM
npm link를 프로젝트가 작은 것 → 큰 것 순서로 진행하는 느낌
--force 또는 --legacy-peer-deps 는 peer dependency conflict 를 방지하기 위해 실행
어제 회사에서 향후 주어질 업무에 대해 차장님과 논의했다. 아마 나는 자사 제품 기능을 Node.js 로 일부 개발 + AI 개발하게 될 것 같다. 일단 너무 좋았다! 백엔드 + AI 조합 ㅎㅎ 그래서 본격적인 업무 시작 전 pc 환경설정을 하는 과정에서 다른 팀원 분들과 Node.js, npm 버전을 맞추어야 했고, 목표 버전은 Node.js는 v16.20.0, npm은 9.6.4이다. 이 때 npm은 Node Package Manager의 약자로 자바스크립트 코드 언어를 위한 노드 패키지를 관리해 주는 툴이다.
1. Node.js : cmd를 이용하여 업데이트 하는 방법
npm을 이용
n 패키지를 이용한다. 구체적인 코드는 다음과 같다.
npm install -g n  //global로 설치해 주어야 Node Vesion을 root에서 관리할 수 있다.

n stable  // 안정 버전 설치
n latest  //  최신 버전 설치
n lts  // lts 버전 설치
n x.x.x  // 특정 버전 설치 ( x.x.x 버전 )
n prune  // 이전 버전들 삭제해 주는 명령어
nvm( Node Vesion Manager )을 이용
nvm 자체를 이용한다. 구체적인 코드는 다음과 같다.
nvm install [ version ]  // 특정 버전 설치
nvm install node           // 최신 버전 설치
nvm uninstall [ version ]  // 이전 버전을 삭제하는 명령어
nvm alias default [version]  // 여러 버전을 설치하고 필요한 환경으로 지정해 주는 명령어
2. npm :cmd를 이용하여 업데이트 하는 방법
위에서 Node.js 버전 업데이트가 npm을 이용하는 것이 있어서 사실 나는 npm 버전부터 업데이트 하려고 했다. 구체적인 코드는 다음과 같다.
npm install -g npm@9.6.4   // 특정 버전 설치 ( x.x.x 버전 )
npm install -g npm@latest  // 최신 버전 설치
꼬리 문제
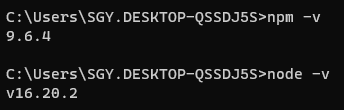
npm이 정상적으로 업데이트 되지 않았다. 검색하고, 생각해봐도 합리적인 원인을 찾기 어려웠다. 그 때 차장님께서 그냥 공식홈페이지 가서 설치하는 것이 빠르다고 조언을 해주셨다...ㅋㅋㅋㅋㅋㅋ 그래서 공홈 가서 릴리즈된 버전을 살펴보니 내가 설치하려 했던 npm 버전이 현재 내 Node.js 버전과 맞지 않았고, 그래서 설치가 되지 않았던 것이었다. 따라서 Node.js는 16.20.2 로 바꿔서 , npm은 9.6.4로 그대로 설치하기로 했다.
3. 공식 홈페이지를 통한 업데이트
Node.js 공식 홈페이지로 들어가 OS와 버전을 확인하고 다운로드 받으면 된다. 다만, Node.js 를 설치하면 그에 맞는 npm이 자동 설치되므로 나중에 cmd로 npm 버전을 업데이트 해주어야 한다.