개요

  • 이번 프로젝트에서는 ①클래스를 상속 받아 기능 확장하여, ②Tensorflow-models 모델의 전형적인 구조에 따라 핵심 코드를 작성하였음
  • 상속 
    • 의미 : 부모 클래스의 프로퍼티, 메서드를 자식 클래스가 물려받는 것
    • 기능 : 부모 클래스 기능을 자식 클래스에서 확장시킬 수 있음.
    • ES6 모듈 개발 전 : 프로토타입 체인 방식으로 상속, 그러나 이는 가독성 떨어짐.
    • ES6 모듈 개발 후 : Class + extends 키워드를 사용하여 상속, 상속하는 것 확실히 티 낼 수 있게 됨
  • 이번 프로젝트에서의 상속
    • Detector 클래스
class Detector {
  constructor () { }

// 그 외 내용: 자바스크립트에서의 getter and setter
// https://ko.javascript.info/property-accessors
  static get DIMENSIONS () {  // 
      return [480, 360];
  }
  enable () {
      this._enable = true;
  }
  disable () {
      this._enable = false;
      this._result = null;
  }
  detect (imageData) { }
  isExistContent (result) {
      return result && result.length > 0;
  }
  draw (canvas) { }
}
module.exports = Detector;


  • HandposeDetector 클래스
class HandposeDetector extends Detector {
  constructor() {
      super();
      this._result;
  }

  enable() {
      super.enable();
      this._canvas = document.createElement("canvas");
      this._canvas.width = Detector.DIMENSIONS[0];
      this._canvas.height = Detector.DIMENSIONS[1];
      this._context = this._canvas.getContext("2d");
  }

  disable() {
      super.disable();
      delete this._context;
      delete this._canvas;
      this._context = null;
      this._canvas = null;
  }

  _createDetector() {
      const model = SupportedModels.MediaPipeHands;
      const detector = createDetector(model, {
          runtime: "tfjs",
          modelType: "lite",
          maxHands: 2, // or 2~10.
          flipHorizontal: false,
          staticImageMode: false,
          detectorModelUrl:
              "/static/tensorflow-models/tfjs-model_handpose_3d_detector_lite_1/model.json",
          landmarkModelUrl:
              "/static/tensorflow-models/tfjs-model_handpose_3d_landmark_lite_1/model.json",
      });

      console.log("model loading success!, detector: ", this._detector);
      return detector;
  }
  
  detect(imageData) {
      if (!this._detector) {
          this._createDetector().then(detector => {
              this._detector = detector;
              console.log("model loading success!, detector: ", this._detector);
          })
      }

      return new Promise((resolve, reject) => {   
          this._detector.estimateHands(imageData).then(result => {
              this._result = result;
              console.log(`this._result: `, this._result);

              this._result.forEach((res) => {
                  console.log(`${res.handedness} hand keypoints:`);
                  res.keypoints.forEach((keypoint, i) => {
                      let x = keypoint.x - 320;
                      let y = keypoint.y - 240;
                      console.log(`Keypoint ${i}: [${x}, ${y}]`);
                  })
              })
              resolve(this._result);
          }).catch(e => {
              reject(e);
          });
      })
  }
/**
중략
**/
}
module.exports = HandposeDetector;


개념 정리

출처 : https://ko.javascript.info/class-inheritance

1. class와 prototype

  • 부모 클래스 Animal과 객체 animal
class Animal {
  constructor(name) {
    this.speed = 0;
    this.name = name;
  }
  run(speed) {
    this.speed = speed;
    alert(`${this.name} 은/는 속도 ${this.speed}로 달립니다.`);
  }
  stop() {
    this.speed = 0;
    alert(`${this.name} 이/가 멈췄습니다.`);
  }
}

let animal = new Animal("동물");
  • 객체 animal과 클래스 Animal의 관계

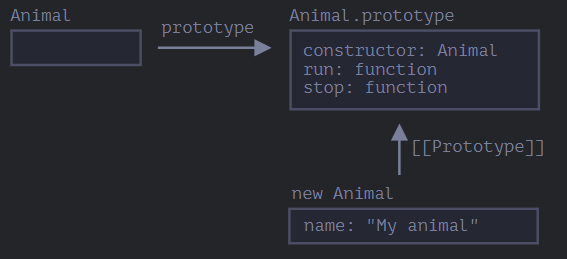
  • Animal vs Animal.prototype
    Animal : Class Definition Animal.prototype : Prototype-Based Definition
    class 키워드로 정의한 클래스 객체의 프로토타입을 확장하여 메서드와 속성을 추가한 것
    ES6 이후 문법 ES6 이전 문법
    클래스 = 메서드(run, stop) + 속성(speed, name)  
    클래스는 생성자(constructor)를 가질 수 있음  
    • constructor
      • 함수 자신, 따라서 위 그림에서 constructor : Animal 로 표시됨
        (∵ 자바스크립트에서 클래스⊂함수, 클래스는 생성자 함수로써 내부적으로 생성자 함수와 프로토타입을 생성하기 때문)
      • 만약 Animal 함수의 프로퍼티 ‘prototype’에 constructor 객체 하나만 있다면 ‘디폴트 프로퍼티가 있다’고 표현 가능
        (디폴트 프로퍼티 : 개발자가 별도로 할당하지 않아도 기본적으로 가지는 프로퍼티)
      • 기능적으로 클래스에서 객체를 생성하고 초기화하기 위해 사용하는 메서드라고 볼 수 있음. 클래스를 통해 새로운 객체를 생성할 때 자동 호출됨


2. extends키워드로 상속 받기

  • 자식 클래스 Rabbit
class Rabbit extends Animal {
  hide() {
    alert(`${this.name} 이/가 숨었습니다!`);
  }
}

let rabbit = new Rabbit("흰 토끼");

rabbit.run(5); // 흰 토끼 은/는 속도 5로 달립니다.
rabbit.hide(); // 흰 토끼 이/가 숨었습니다!
  • 클래스 Rabbit을 이용하여 만든 객체 rabbit
    : rabbit은 rabbit.hide() 로 Rabbit 클래스의 메서드에도, rabbit.run() 으로 Animal의 메서드에도 접근 가능
  • extends는 프로토타입을 기반으로 동작
    • 따라서 extends는 Rabbit.prototype.[[Prototype]]Animal.prototype으로 설정함
    • Rabbit.prototype에서 메서드를 찾지 못하면 Animal.prototype에서 메서드를 가져옴


  • 프로젝트에 적용
class HandposeDetector extends Detector { }


3. 메서드 오버라이딩(Method Overriding) : super 키워드 활용

  • 의미 : 부모 클래스의 메서드재정의하여 자식 클래스에서 사용하는 것
    → 재정의 : 일부 기능만 변경 or 기능 확장
  • super 키워드 활용
    • super(…) : 부모 생성자 자체 호출, 따라서 자식 생성자 내부에서만 사용 가능
    • super.method명(…) : 부모 클래스의 method를 호출
  • 핵심 코드 : 부모 클래스의 stop() method를 오버라이딩한 rabbit.stop() 정의
class Rabbit extends Animal {
  hide() {
    alert(`${this.name}가 숨었습니다!`);
  }

  stop() {
    super.stop(); // 부모 클래스의 stop을 호출해 멈추고,
    this.hide(); // 숨습니다.
  }
}

let rabbit = new Rabbit("흰 토끼");
rabbit.run(5); // 흰 토끼가 속도 5로 달립니다.
rabbit.stop(); // 흰 토끼가 멈췄습니다. 흰 토끼가 숨었습니다!
  • 프로젝트에 적용
enable() {
      super.enable();
      this._canvas = document.createElement("canvas");
      this._canvas.width = Detector.DIMENSIONS[0];
      this._canvas.height = Detector.DIMENSIONS[1];
      this._context = this._canvas.getContext("2d");
  }


4. 생성자 오버라이딩(Constructor Overriding)

  • 의미 : 부모 클래스의 생성자재정의하여 자식 클래스에서 사용하는 것
  • super 키워드 활용
    • super 키워드가 상속 클래스의 생성자 함수가 실행되면, 부모 클래스의 생성자가 ①빈 객체를 만들고 ②this에 이 객체가 할당되도록 함
    • 따라서 super 키워드가 없으면 this가 될 객체가 생성되지 않아 자식 클래스 생성자 실행 시 오류 발생함
  • 핵심 코드
class Rabbit extends Animal {
  constructor(name, earLength) {
		super(name);
    this.earLength = earLength;
  }
  // ...
}
  • 프로젝트에 적용
class HandposeDetector extends Detector {
  constructor() {
      super();
      this._result;
  }
}


배운점 (요약)

  • 이번 프로젝트에서는 ①클래스를 상속 받아 기능 확장하여, ② Tensorflow-models 모델의 전형적인 구조 에 따라 핵심 코드를 작성하였음
  • 실제 코드를 작성할 때는 정확히 무슨 뜻인지 모르고, 용례를 보고 이런 느낌이구나 라고 생각하며 사용했음
  • 그러나 프로젝트를 마무리하며 개념 정리를 하니, 밑그림만 있던 것이 구체적인 채색까지 되는 느낌이었음. 따라서 향후 활용할 수 있는 자신감이 생겼음. 또한 효율적, 효과적인 코드를 위해 상속 및 오버라이딩은 필수 요소라고 생각했음.

문제 인식

  • 정지 버튼을 누르면 캔버스에 그려졌던 손, 얼굴, 포즈의 keypoints와 path가 남아있는 현상
  • 사수께서 clearRect() 함수가 정상적으로 적용되지 않았다고 알려주심


cleatRect() 함수 사용법

const canvas = document.getElementById("myCanvas");
const ctx = canvas.getContext("2d");
ctx.fillStyle = "red";
ctx.fillRect(20, 20, 200, 100);
ctx.clearRect(40, 40, 50, 50);
  • 결과물 : 빨간색 context 내부에 설정한 크기의 사각형의 색이 지워졌음

  • 그러나 이 코드가 개별 detector 함수에 들어가면 안 됨 (∵ 향후 다른 detector 함수와 함께 실행하였을 때 오류 가능성)
  • 따라서 detector 관련 코드를 모두 관리하는 detector-manager 코드에서 clearRect() 함수를 적용해야 함


해결법

  • draw 하여 캔버스에 비디오를 그리기 전에 clearRect 하여 이전의 캔버스를 지워야함
  • 지속적으로 렌더링되어 캔버스에 이미지가 그려지기 때문
if (result) {
  if (dt.drawBox) {
      dt.context.clearRect(0,0,Detector.DIMENSIONS[0],Detector.DIMENSIONS[1]);
      dt.detector.draw(dt.canvas);
      this._renderer.updateBitmapSkin(dt.skinId, dt.canvas, 1);
  } 
} else {
  if (dt.drawBox && hasResult) {
      dt.context.clearRect(0,0,Detector.DIMENSIONS[0],Detector.DIMENSIONS[1]);
      this._renderer.updateBitmapSkin(dt.skinId,dt.canvas,1);
  }
}

문제 인식

  • 일렉트론으로 구현해보았을 때는 이하 코드처럼 라이브 비디오 자체를 매개변수로 예측하였음.
const hands = await detector.estimateHands(camera.video, { flipHorizontal: false });
  • 그러나 자사 소프트웨어 기존 코드에서는 estimate 함수의 매개변수가 이미지임. 따라서 기존 방식을 따라 가야 했음


1. Tensorflow.js 공식 깃헙

  • 매개변수의 확인 → 이미지와 비디오 둘 다 가능!
  • 따라서 이미지로 estimate 함수 사용하여 일렉트론으로 구현해보고자 함
// 이미지
const result = await detector.estimateHands(image, {
  staticImageMode: true
} as handPoseDetection.MediaPipeHandsTfjsEstimationConfig);

// 비디오
const hands = await detector.estimateHands(video, null /* config */);


2. 일렉트론으로 구현 

  • 핵심 로직
    1. ctx.drawImage(video, 0, 0, canvas.width, canvas.height) 
      : 웹 캠에서 받아온 비디오 현재 프레임을 캔버스에 표시
    2. ctx.getImageData(0, 0, canvas.width, canvas.height)
      : 캔버스의 이미지 데이터를 가져옴 (캡처)
  • 핵심 코드 
_captureImageData(video) {
  const canvas = document.createElement('canvas');
  const ctx = canvas.getContext('2d');
  canvas.width = video.videoWidth;  
  canvas.height = video.videoHeight;
  ctx.drawImage(video, 0, 0, canvas.width, canvas.height);  
  return ctx.getImageData(0, 0, canvas.width, canvas.height);
}

// estimate 함수에 적용
const detector = createDetector(SupportedModels.MediapipeHands);
const imageData = HandposeDetector.captureImageData(video);
const result = await detector.estimateHands(imageData);


해결법 (요약)

  • GUI 프로젝트 코드에 이미 video → image 로 바꾸는 로직이 작성되어 있었음
// drawImage()
if (lastUpdate + cacheTimeout < now) {
  try {
      if (mirror) {
          context.scale(-1, 1);
          context.translate(width * -1, 0);
      }
      context.drawImage(this._element,
          // source x, y, width, height
          0, 0, elementDimension.width, elementDimension.height,
          // dest x, y, width, height
          0, 0, width, height
      );
      context.setTransform(1, 0, 0, 1, 0, 0);
      workspace.lastUpdate = now;
  } catch {
      return null;
  }
}

// getImageData()
if (formatCache.lastUpdate + cacheTimeout < now) {
	if (format === CameraProvider.FORMAT_IMAGE_DATA) {
	    formatCache.lastData = context.getImageData(0, 0, width, height);
}


  • 나는 이미 정해져 있는 detect 함수의 매개변수인 imageData를 가져와 처리함
detect(imageData) {
	return new Promise((resolve, reject) => {   
    this._detector.estimateHands(imageData).then(result => {
        this._result = result;
        console.log(`this._result: `, this._result);

        this._result.forEach((res) => {
            console.log(`${res.handedness} hand keypoints:`);
            res.keypoints.forEach((keypoint, i) => {
                let x = keypoint.x - 320;
                let y = keypoint.y - 240;
                console.log(`Keypoint ${i}: [${x}, ${y}]`);
            })
        })
        resolve(this._result);
    }).catch(e => {
        reject(e);
    });
	})
}


개요


1. npm install 해야 할 최소한의 모듈

<!-- 둘이 set-->
npm install @tensorflow-models/hand-pose-detection --legacy-peer-deps
npm install @mediapipe/hands --legacy-peer-deps

<!-- 위의 핵심 라이브러리를 실행할 수 있도록 하기 위한 peer dependency-->
npm install @tensorflow/tfjs --legacy-peer-deps
npm install @tensorflow/tfjs-converter --legacy-peer-deps
npm install @tensorflow/tfjs-core --legacy-peer-deps
  • 추가적으로 필요하다고 여겨지는 @tensorflow/tfjs-backend-webgl @tensorflow/tfjs-backend-wasm @tensorflow/tfjs-backend-webgpu 은 이하 peer dependency 에 이미 포함되어 있음
  • 특히 webgl을 tf.setBackend(’webgl’) 식으로 설정할 필요도 없음. 아래 설치하고 핵심 라이브러리를 require 하면 자동 설정됨
  • 주의할 점 : peer dependency 충돌 해결하는 글 보러 가기

이하 글의 코드와 글의 근본적인 출처는 Tensorflow-models 공식 깃헙입니다!


개요

  • 이하에서는 이번 프로젝트에서 구현한 hand-pose-detection, face-landmarks-detection, pose-detection 모델을 로딩하는 방법을 정리하였음.
  • 위 모델들을 로딩한다는 것 = createDetector() 함수를 실행한다는 것 
  • 이하 방법은 model loading 시리즈 2편인 npm install 해야하는 최소한의 모듈 글을 참고해서 코드를 짜야 보다 효율적임
  • 또한 createDetector() 함수를 오프라인으로 저장한 모델과 함께 사용하는 경우, 버전을 제대로 맞추지 않는다면 quantization 오류를 계에에에에속 맞닥뜨릴 것임. 따라서 해당 오류를 해결한 글과 함께 보길 권장함 


1. CDN

  • CDN 이란 
    • Contents Delivery Network : 콘텐츠 전송 네트워크
    • 콘텐츠를 임시 저장 서버에 옮겼다가 수요가 있을 때 콘텐츠를 전달
  • 핵심 코드 : 이하 코드는 Tensorflow-models 공식 깃헙에서 demo 코드로 명시한 방법
<!-- Require the peer dependencies of hand-pose-detection. -->
<script src="https://cdn.jsdelivr.net/npm/@tensorflow/tfjs-core"></script>
<script src="https://cdn.jsdelivr.net/npm/@tensorflow/tfjs-converter"></script>

<!-- You must explicitly require a TF.js backend if you're not using the TF.js union bundle. -->
<script src="https://cdn.jsdelivr.net/npm/@tensorflow/tfjs-backend-webgl"></script>

<script src="https://cdn.jsdelivr.net/npm/@tensorflow-models/hand-pose-detection"></script>


2. npm install + require( 또는 import )

  • npm 모듈 설치 
npm install @tensorflow-models/hand-pose-detection
npm install @tensorflow/tfjs-core, @tensorflow/tfjs-converter
npm install @tensorflow/tfjs-backend-webgl
  • require (또는 import)
// require
const {createDetector,SupportedModels} = require("@tensorflow-models/hand-pose-detection");

// import
import * as handPoseDetection from '@tensorflow-models/hand-pose-detection';
import * as tf from '@tensorflow/tfjs-core';
// Register WebGL backend.
import '@tensorflow/tfjs-backend-webgl';
  • 그러나 위의 1번, 2번 방법은 온라인 환경에서만 정상 작동한다는 단점이 있음. 이를 보완하는 방법으로 모델을 오프라인으로 저장해서 불러오는 3번이 있음


3. 오프라인 저장 

  • 모델을 오프라인 저장 해야 하는 이유
    1. CORS 에러 (Cross-Origin Resource Sharing)
      • 웹 브라우저가 다른 도메인, 프로토콜, 포트에서 실행되는 웹페이지에서 리소스를 요청할 때 발생
      • 따라서 모델을 오프라인 저장하지 않고, localhost:5050 에서 localhost:8888 로 model.json을 요청한다면,
        웹 브라우저가 포트 번호가 달라 다른 출처(origin)으로 간주하고 CORS 정책에 따라 요청 차단함
      • CORS에 대해 보다 전문적으로 설명한 글 보러 가기 
 

CORS


ko.javascript.info

       2. 자사 소프트웨어 특성 상 인터넷이 끊어져도 제품 사용할 수 있어야 함
          : 그러나 CDN 방식과 npm install 방식은 온라인 상태여야만 Tensorflow-models의 npm 모듈 사용 가능


Find Pre-trained Models | Kaggle

Use and download pre-trained models for your machine learning projects.

www.kaggle.com


        2. createDetector() 함수의 옵션 지정 : detectorModelUrl, landmarkModelUrl 모델 저장 장소 지정

_createDetector() {
  const model = SupportedModels.MediaPipeHands;
  const detector = createDetector(model, {
      runtime: "tfjs",
      modelType: "lite",
      maxHands: 2, // or 2~10.
      flipHorizontal: false,
      staticImageMode: false,
      detectorModelUrl:
          "/static/tensorflow-models/tfjs-model_handpose_3d_detector_lite_1/model.json",
      landmarkModelUrl:
          "/static/tensorflow-models/tfjs-model_handpose_3d_landmark_lite_1/model.json",
  });
  return detector;
}


      3. 비동기로 모델 로딩

if (!this._detector) {
    this._createDetector().then(detector => {
        this._detector = detector;
        console.log("model loading success!, detector: ", this._detector);
    })
}


      4. 모델 로딩 결과 : <pending> → 펼치면 “fulfilled” 출력되어야 함

개요

Tensorflow-models에 속해 있는 모델들의 전형적인 사용 구조를 설명하려고 함. 미래의 나를 위해... 이하 모든 글과 코드는 근본적으로 Tensorflow-models 공식 깃헙에 출처가 있음.


1. model loading : createDetector

_createDetector() {
  const model = SupportedModels.MediaPipeHands;
  const detector = createDetector(model, {
      runtime: "tfjs",
      modelType: "lite",
      maxHands: 2, // or 2~10.
      flipHorizontal: false,
      staticImageMode: false,
      detectorModelUrl:
          "/static/tensorflow-models/tfjs-model_handpose_3d_detector_lite_1/model.json",
      landmarkModelUrl:
          "/static/tensorflow-models/tfjs-model_handpose_3d_landmark_lite_1/model.json",
  });

  console.log("model loading success!, detector: ", this._detector);
  return detector;
}


2. detect

  • detector.estimateHands(video or image)
  • estimateFaces 등 다양한 시리즈 있음
detect(imageData) {
  if (!this._detector) {
      this._createDetector().then(detector => {
          this._detector = detector;
          console.log("model loading success!, detector: ", this._detector);
      })
  }

  return new Promise((resolve, reject) => {   
      this._detector.estimateHands(imageData).then(result => {
          this._result = result;
          console.log(`this._result: `, this._result);

          this._result.forEach((res) => {
              console.log(`${res.handedness} hand keypoints:`);
              res.keypoints.forEach((keypoint, i) => {
                  let x = keypoint.x - 320;
                  let y = keypoint.y - 240;
                  console.log(`Keypoint ${i}: [${x}, ${y}]`);
              })
          })
          resolve(this._result);
      }).catch(e => {
          reject(e);
      });
  })
}


3. draw : draw(canvas) 등 매개 변수는 다양할 수 있음

  • drawKeypoint
  • drawPath
draw(canvas) {
    if (!canvas || !this.isExistContent(this._result)) return canvas;
    const ctx = canvas.getContext("2d");
    if (this._result) {
        this._result.forEach( (res) => {
            ctx.fillStyle = res.handedness === "Left" ? "Red" : "Blue";
            ctx.strokeStyle = "White";
            ctx.lineWidth = 2;
            res.keypoints.forEach(keypoint => {
                this._drawKeypoint(ctx, keypoint);
            });
            Object.keys(FINGER_INDICES).forEach(finger => {
                const points = FINGER_INDICES[finger].map(idx => res.keypoints[idx]);
                this._drawPath(ctx, points, false);
            });
        });
    }
    return canvas;
}

_drawKeypoint(ctx, keypoint) {
    ctx.beginPath();
    ctx.arc(keypoint.x - 2, keypoint.y - 2, 3, 0, 2 * Math.PI);
    ctx.fill();
}

_drawPath(ctx, points, closePath) {
    const region = new Path2D();
    region.moveTo(points[0].x, points[0].y);
    points.slice(1).forEach(point => region.lineTo(point.x, point.y));
    if (closePath) {
        region.closePath();
    }
    ctx.stroke(region);
}


+ Recent posts